mirror of
https://github.com/babysor/MockingBird.git
synced 2024-03-22 13:11:31 +08:00
288 lines
17 KiB
Markdown
288 lines
17 KiB
Markdown
## 实时语音克隆 - 中文/普通话
|
||

|
||
|
||
[](http://choosealicense.com/licenses/mit/)
|
||
|
||
### [English](README.md) | 中文
|
||
|
||
### [DEMO VIDEO](https://www.bilibili.com/video/BV17Q4y1B7mY/) | [Wiki教程](https://github.com/babysor/MockingBird/wiki/Quick-Start-(Newbie)) | [训练教程](https://vaj2fgg8yn.feishu.cn/docs/doccn7kAbr3SJz0KM0SIDJ0Xnhd)
|
||
|
||
## 特性
|
||
🌍 **中文** 支持普通话并使用多种中文数据集进行测试:aidatatang_200zh, magicdata, aishell3, biaobei, MozillaCommonVoice, data_aishell 等
|
||
|
||
🤩 **PyTorch** 适用于 pytorch,已在 1.9.0 版本(最新于 2021 年 8 月)中测试,GPU Tesla T4 和 GTX 2060
|
||
|
||
🌍 **Windows + Linux** 可在 Windows 操作系统和 linux 操作系统中运行(苹果系统M1版也有社区成功运行案例)
|
||
|
||
🤩 **Easy & Awesome** 仅需下载或新训练合成器(synthesizer)就有良好效果,复用预训练的编码器/声码器,或实时的HiFi-GAN作为vocoder
|
||
|
||
🌍 **Webserver Ready** 可伺服你的训练结果,供远程调用
|
||
|
||
### 进行中的工作
|
||
* GUI/客户端大升级与合并
|
||
|
||
- [x] 初始化框架 `./mkgui` (基于streamlit + fastapi)和 [技术设计](https://vaj2fgg8yn.feishu.cn/docs/doccnvotLWylBub8VJIjKzoEaee)
|
||
|
||
- [x] 增加 Voice Cloning and Conversion的演示页面
|
||
|
||
- [x] 增加Voice Conversion的预处理preprocessing 和训练 training 页面
|
||
|
||
- [ ] 增加其他的的预处理preprocessing 和训练 training 页面
|
||
|
||
* 模型后端基于ESPnet2升级
|
||
|
||
|
||
## 开始
|
||
### 1. 安装要求
|
||
#### 1.1 通用配置
|
||
> 按照原始存储库测试您是否已准备好所有环境。
|
||
运行工具箱(demo_toolbox.py)需要 **Python 3.7 或更高版本** 。
|
||
|
||
* 安装 [PyTorch](https://pytorch.org/get-started/locally/)。
|
||
> 如果在用 pip 方式安装的时候出现 `ERROR: Could not find a version that satisfies the requirement torch==1.9.0+cu102 (from versions: 0.1.2, 0.1.2.post1, 0.1.2.post2)` 这个错误可能是 python 版本过低,3.9 可以安装成功
|
||
* 安装 [ffmpeg](https://ffmpeg.org/download.html#get-packages)。
|
||
* 运行`pip install -r requirements.txt` 来安装剩余的必要包。
|
||
* 安装 webrtcvad `pip install webrtcvad-wheels`。
|
||
|
||
#### 1.2 M1芯片Mac环境配置(Inference Time)
|
||
> 以下环境按x86-64搭建,使用原生的`demo_toolbox.py`,可作为在不改代码情况下快速使用的workaround。
|
||
>
|
||
> 如需使用M1芯片训练,因`demo_toolbox.py`依赖的`PyQt5`不支持M1,则应按需修改代码,或者尝试使用`web.py`。
|
||
|
||
* 安装`PyQt5`,参考[这个链接](https://stackoverflow.com/a/68038451/20455983)
|
||
* 用Rosetta打开Terminal,参考[这个链接](https://dev.to/courier/tips-and-tricks-to-setup-your-apple-m1-for-development-547g)
|
||
* 用系统Python创建项目虚拟环境
|
||
```
|
||
/usr/bin/python3 -m venv /PathToMockingBird/venv
|
||
source /PathToMockingBird/venv/bin/activate
|
||
```
|
||
* 升级pip并安装`PyQt5`
|
||
```
|
||
pip install --upgrade pip
|
||
pip install pyqt5
|
||
```
|
||
* 安装`pyworld`和`ctc-segmentation`
|
||
> 这里两个文件直接`pip install`的时候找不到wheel,尝试从c里build时找不到`Python.h`报错
|
||
* 安装`pyworld`
|
||
* `brew install python` 通过brew安装python时会自动安装`Python.h`
|
||
* `export CPLUS_INCLUDE_PATH=/opt/homebrew/Frameworks/Python.framework/Headers` 对于M1,brew安装`Python.h`到上述路径。把路径添加到环境变量里
|
||
* `pip install pyworld`
|
||
|
||
* 安装`ctc-segmentation`
|
||
> 因上述方法没有成功,选择从[github](https://github.com/lumaku/ctc-segmentation) clone源码手动编译
|
||
* `git clone https://github.com/lumaku/ctc-segmentation.git` 克隆到任意位置
|
||
* `cd ctc-segmentation`
|
||
* `source /PathToMockingBird/venv/bin/activate` 假设一开始未开启,打开MockingBird项目的虚拟环境
|
||
* `cythonize -3 ctc_segmentation/ctc_segmentation_dyn.pyx`
|
||
* `/usr/bin/arch -x86_64 python setup.py build` 要注意明确用x86-64架构编译
|
||
* `/usr/bin/arch -x86_64 python setup.py install --optimize=1 --skip-build`用x86-64架构安装
|
||
|
||
* 安装其他依赖
|
||
* `/usr/bin/arch -x86_64 pip install torch torchvision torchaudio` 这里用pip安装`PyTorch`,明确架构是x86
|
||
* `pip install ffmpeg` 安装ffmpeg
|
||
* `pip install -r requirements.txt`
|
||
|
||
* 运行
|
||
> 参考[这个链接](https://youtrack.jetbrains.com/issue/PY-46290/Allow-running-Python-under-Rosetta-2-in-PyCharm-for-Apple-Silicon)
|
||
,让项目跑在x86架构环境上
|
||
* `vim /PathToMockingBird/venv/bin/pythonM1`
|
||
* 写入以下代码
|
||
```
|
||
#!/usr/bin/env zsh
|
||
mydir=${0:a:h}
|
||
/usr/bin/arch -x86_64 $mydir/python "$@"
|
||
```
|
||
* `chmod +x pythonM1` 设为可执行文件
|
||
* 如果使用PyCharm,则把Interpreter指向`pythonM1`,否则也可命令行运行`/PathToMockingBird/venv/bin/pythonM1 demo_toolbox.py`
|
||
|
||
### 2. 准备预训练模型
|
||
考虑训练您自己专属的模型或者下载社区他人训练好的模型:
|
||
> 近期创建了[知乎专题](https://www.zhihu.com/column/c_1425605280340504576) 将不定期更新炼丹小技巧or心得,也欢迎提问
|
||
#### 2.1 使用数据集自己训练encoder模型 (可选)
|
||
|
||
* 进行音频和梅尔频谱图预处理:
|
||
`python encoder_preprocess.py <datasets_root>`
|
||
使用`-d {dataset}` 指定数据集,支持 librispeech_other,voxceleb1,aidatatang_200zh,使用逗号分割处理多数据集。
|
||
* 训练encoder: `python encoder_train.py my_run <datasets_root>/SV2TTS/encoder`
|
||
> 训练encoder使用了visdom。你可以加上`-no_visdom`禁用visdom,但是有可视化会更好。在单独的命令行/进程中运行"visdom"来启动visdom服务器。
|
||
|
||
#### 2.2 使用数据集自己训练合成器模型(与2.3二选一)
|
||
* 下载 数据集并解压:确保您可以访问 *train* 文件夹中的所有音频文件(如.wav)
|
||
* 进行音频和梅尔频谱图预处理:
|
||
`python pre.py <datasets_root> -d {dataset} -n {number}`
|
||
可传入参数:
|
||
* `-d {dataset}` 指定数据集,支持 aidatatang_200zh, magicdata, aishell3, data_aishell, 不传默认为aidatatang_200zh
|
||
* `-n {number}` 指定并行数,CPU 11770k + 32GB实测10没有问题
|
||
> 假如你下载的 `aidatatang_200zh`文件放在D盘,`train`文件路径为 `D:\data\aidatatang_200zh\corpus\train` , 你的`datasets_root`就是 `D:\data\`
|
||
|
||
* 训练合成器:
|
||
`python synthesizer_train.py mandarin <datasets_root>/SV2TTS/synthesizer`
|
||
|
||
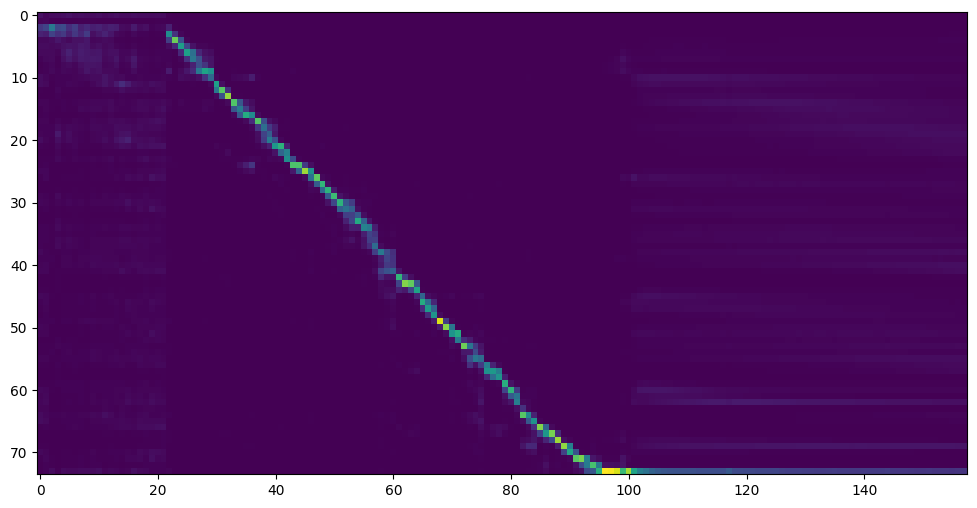
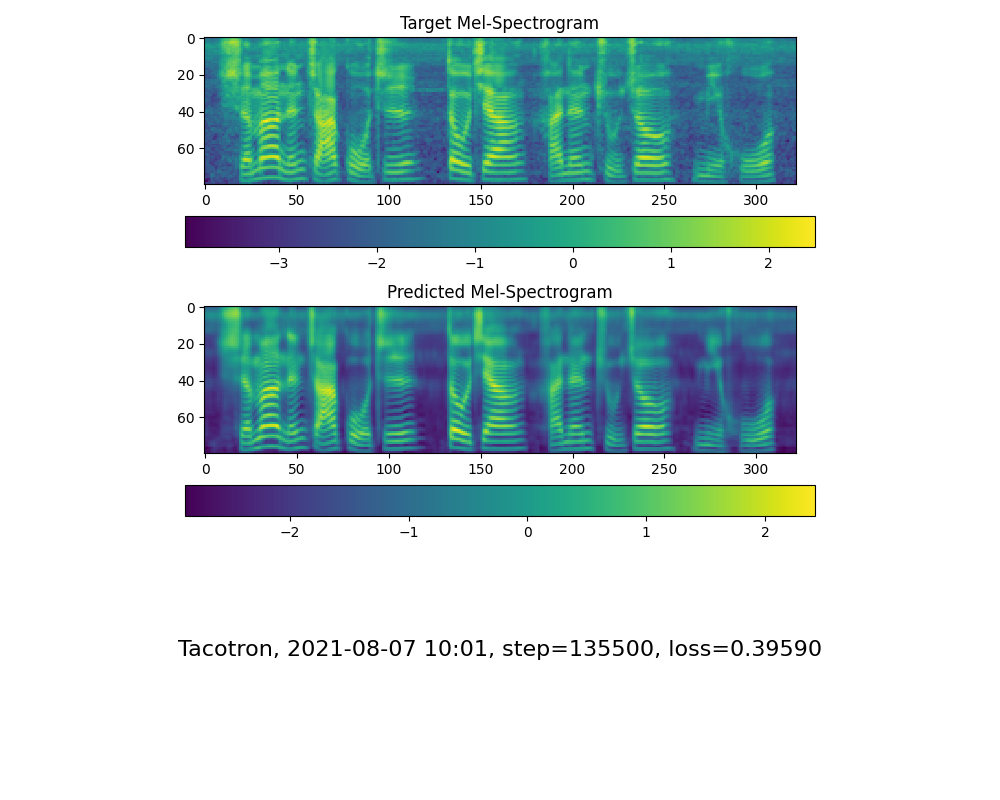
* 当您在训练文件夹 *synthesizer/saved_models/* 中看到注意线显示和损失满足您的需要时,请转到`启动程序`一步。
|
||
|
||
#### 2.3使用社区预先训练好的合成器(与2.2二选一)
|
||
> 当实在没有设备或者不想慢慢调试,可以使用社区贡献的模型(欢迎持续分享):
|
||
|
||
| 作者 | 下载链接 | 效果预览 | 信息 |
|
||
| --- | ----------- | ----- | ----- |
|
||
| 作者 | https://pan.baidu.com/s/1iONvRxmkI-t1nHqxKytY3g [百度盘链接](https://pan.baidu.com/s/1iONvRxmkI-t1nHqxKytY3g) 4j5d | | 75k steps 用3个开源数据集混合训练
|
||
| 作者 | https://pan.baidu.com/s/1fMh9IlgKJlL2PIiRTYDUvw [百度盘链接](https://pan.baidu.com/s/1fMh9IlgKJlL2PIiRTYDUvw) 提取码:om7f | | 25k steps 用3个开源数据集混合训练, 切换到tag v0.0.1使用
|
||
|@FawenYo | https://drive.google.com/file/d/1H-YGOUHpmqKxJ9FRc6vAjPuqQki24UbC/view?usp=sharing [百度盘链接](https://pan.baidu.com/s/1vSYXO4wsLyjnF3Unl-Xoxg) 提取码:1024 | [input](https://github.com/babysor/MockingBird/wiki/audio/self_test.mp3) [output](https://github.com/babysor/MockingBird/wiki/audio/export.wav) | 200k steps 台湾口音需切换到tag v0.0.1使用
|
||
|@miven| https://pan.baidu.com/s/1PI-hM3sn5wbeChRryX-RCQ 提取码:2021 | https://www.bilibili.com/video/BV1uh411B7AD/ | 150k steps 注意:根据[issue](https://github.com/babysor/MockingBird/issues/37)修复 并切换到tag v0.0.1使用
|
||
|
||
#### 2.4训练声码器 (可选)
|
||
对效果影响不大,已经预置3款,如果希望自己训练可以参考以下命令。
|
||
* 预处理数据:
|
||
`python vocoder_preprocess.py <datasets_root> -m <synthesizer_model_path>`
|
||
> `<datasets_root>`替换为你的数据集目录,`<synthesizer_model_path>`替换为一个你最好的synthesizer模型目录,例如 *sythensizer\saved_models\xxx*
|
||
|
||
|
||
* 训练wavernn声码器:
|
||
`python vocoder_train.py <trainid> <datasets_root>`
|
||
> `<trainid>`替换为你想要的标识,同一标识再次训练时会延续原模型
|
||
|
||
* 训练hifigan声码器:
|
||
`python vocoder_train.py <trainid> <datasets_root> hifigan`
|
||
> `<trainid>`替换为你想要的标识,同一标识再次训练时会延续原模型
|
||
* 训练fregan声码器:
|
||
`python vocoder_train.py <trainid> <datasets_root> --config config.json fregan`
|
||
> `<trainid>`替换为你想要的标识,同一标识再次训练时会延续原模型
|
||
* 将GAN声码器的训练切换为多GPU模式:修改GAN文件夹下.json文件中的"num_gpus"参数
|
||
### 3. 启动程序或工具箱
|
||
您可以尝试使用以下命令:
|
||
|
||
### 3.1 启动Web程序(v2):
|
||
`python web.py`
|
||
运行成功后在浏览器打开地址, 默认为 `http://localhost:8080`
|
||
> * 仅支持手动新录音(16khz), 不支持超过4MB的录音,最佳长度在5~15秒
|
||
|
||
### 3.2 启动工具箱:
|
||
`python demo_toolbox.py -d <datasets_root>`
|
||
> 请指定一个可用的数据集文件路径,如果有支持的数据集则会自动加载供调试,也同时会作为手动录制音频的存储目录。
|
||
|
||
<img width="1042" alt="d48ea37adf3660e657cfb047c10edbc" src="https://user-images.githubusercontent.com/7423248/134275227-c1ddf154-f118-4b77-8949-8c4c7daf25f0.png">
|
||
|
||
### 4. 番外:语音转换Voice Conversion(PPG based)
|
||
想像柯南拿着变声器然后发出毛利小五郎的声音吗?本项目现基于PPG-VC,引入额外两个模块(PPG extractor + PPG2Mel), 可以实现变声功能。(文档不全,尤其是训练部分,正在努力补充中)
|
||
#### 4.0 准备环境
|
||
* 确保项目以上环境已经安装ok,运行`pip install espnet` 来安装剩余的必要包。
|
||
* 下载以下模型 链接:https://pan.baidu.com/s/1bl_x_DHJSAUyN2fma-Q_Wg
|
||
提取码:gh41
|
||
* 24K采样率专用的vocoder(hifigan)到 *vocoder\saved_models\xxx*
|
||
* 预训练的ppg特征encoder(ppg_extractor)到 *ppg_extractor\saved_models\xxx*
|
||
* 预训练的PPG2Mel到 *ppg2mel\saved_models\xxx*
|
||
|
||
#### 4.1 使用数据集自己训练PPG2Mel模型 (可选)
|
||
|
||
* 下载aidatatang_200zh数据集并解压:确保您可以访问 *train* 文件夹中的所有音频文件(如.wav)
|
||
* 进行音频和梅尔频谱图预处理:
|
||
`python pre4ppg.py <datasets_root> -d {dataset} -n {number}`
|
||
可传入参数:
|
||
* `-d {dataset}` 指定数据集,支持 aidatatang_200zh, 不传默认为aidatatang_200zh
|
||
* `-n {number}` 指定并行数,CPU 11700k在8的情况下,需要运行12到18小时!待优化
|
||
> 假如你下载的 `aidatatang_200zh`文件放在D盘,`train`文件路径为 `D:\data\aidatatang_200zh\corpus\train` , 你的`datasets_root`就是 `D:\data\`
|
||
|
||
* 训练合成器, 注意在上一步先下载好`ppg2mel.yaml`, 修改里面的地址指向预训练好的文件夹:
|
||
`python ppg2mel_train.py --config .\ppg2mel\saved_models\ppg2mel.yaml --oneshotvc `
|
||
* 如果想要继续上一次的训练,可以通过`--load .\ppg2mel\saved_models\<old_pt_file>` 参数指定一个预训练模型文件。
|
||
|
||
#### 4.2 启动工具箱VC模式
|
||
您可以尝试使用以下命令:
|
||
`python demo_toolbox.py -vc -d <datasets_root>`
|
||
> 请指定一个可用的数据集文件路径,如果有支持的数据集则会自动加载供调试,也同时会作为手动录制音频的存储目录。
|
||
<img width="971" alt="微信图片_20220305005351" src="https://user-images.githubusercontent.com/7423248/156805733-2b093dbc-d989-4e68-8609-db11f365886a.png">
|
||
|
||
## 引用及论文
|
||
> 该库一开始从仅支持英语的[Real-Time-Voice-Cloning](https://github.com/CorentinJ/Real-Time-Voice-Cloning) 分叉出来的,鸣谢作者。
|
||
|
||
| URL | Designation | 标题 | 实现源码 |
|
||
| --- | ----------- | ----- | --------------------- |
|
||
| [1803.09017](https://arxiv.org/abs/1803.09017) | GlobalStyleToken (synthesizer)| Style Tokens: Unsupervised Style Modeling, Control and Transfer in End-to-End Speech Synthesis | 本代码库 |
|
||
| [2010.05646](https://arxiv.org/abs/2010.05646) | HiFi-GAN (vocoder)| Generative Adversarial Networks for Efficient and High Fidelity Speech Synthesis | 本代码库 |
|
||
| [2106.02297](https://arxiv.org/abs/2106.02297) | Fre-GAN (vocoder)| Fre-GAN: Adversarial Frequency-consistent Audio Synthesis | 本代码库 |
|
||
|[**1806.04558**](https://arxiv.org/pdf/1806.04558.pdf) | SV2TTS | Transfer Learning from Speaker Verification to Multispeaker Text-To-Speech Synthesis | 本代码库 |
|
||
|[1802.08435](https://arxiv.org/pdf/1802.08435.pdf) | WaveRNN (vocoder) | Efficient Neural Audio Synthesis | [fatchord/WaveRNN](https://github.com/fatchord/WaveRNN) |
|
||
|[1703.10135](https://arxiv.org/pdf/1703.10135.pdf) | Tacotron (synthesizer) | Tacotron: Towards End-to-End Speech Synthesis | [fatchord/WaveRNN](https://github.com/fatchord/WaveRNN)
|
||
|[1710.10467](https://arxiv.org/pdf/1710.10467.pdf) | GE2E (encoder)| Generalized End-To-End Loss for Speaker Verification | 本代码库 |
|
||
|
||
## 常见问题(FQ&A)
|
||
#### 1.数据集在哪里下载?
|
||
| 数据集 | OpenSLR地址 | 其他源 (Google Drive, Baidu网盘等) |
|
||
| --- | ----------- | ---------------|
|
||
| aidatatang_200zh | [OpenSLR](http://www.openslr.org/62/) | [Google Drive](https://drive.google.com/file/d/110A11KZoVe7vy6kXlLb6zVPLb_J91I_t/view?usp=sharing) |
|
||
| magicdata | [OpenSLR](http://www.openslr.org/68/) | [Google Drive (Dev set)](https://drive.google.com/file/d/1g5bWRUSNH68ycC6eNvtwh07nX3QhOOlo/view?usp=sharing) |
|
||
| aishell3 | [OpenSLR](https://www.openslr.org/93/) | [Google Drive](https://drive.google.com/file/d/1shYp_o4Z0X0cZSKQDtFirct2luFUwKzZ/view?usp=sharing) |
|
||
| data_aishell | [OpenSLR](https://www.openslr.org/33/) | |
|
||
> 解压 aidatatang_200zh 后,还需将 `aidatatang_200zh\corpus\train`下的文件全选解压缩
|
||
|
||
#### 2.`<datasets_root>`是什麼意思?
|
||
假如数据集路径为 `D:\data\aidatatang_200zh`,那么 `<datasets_root>`就是 `D:\data`
|
||
|
||
#### 3.训练模型显存不足
|
||
训练合成器时:将 `synthesizer/hparams.py`中的batch_size参数调小
|
||
```
|
||
//调整前
|
||
tts_schedule = [(2, 1e-3, 20_000, 12), # Progressive training schedule
|
||
(2, 5e-4, 40_000, 12), # (r, lr, step, batch_size)
|
||
(2, 2e-4, 80_000, 12), #
|
||
(2, 1e-4, 160_000, 12), # r = reduction factor (# of mel frames
|
||
(2, 3e-5, 320_000, 12), # synthesized for each decoder iteration)
|
||
(2, 1e-5, 640_000, 12)], # lr = learning rate
|
||
//调整后
|
||
tts_schedule = [(2, 1e-3, 20_000, 8), # Progressive training schedule
|
||
(2, 5e-4, 40_000, 8), # (r, lr, step, batch_size)
|
||
(2, 2e-4, 80_000, 8), #
|
||
(2, 1e-4, 160_000, 8), # r = reduction factor (# of mel frames
|
||
(2, 3e-5, 320_000, 8), # synthesized for each decoder iteration)
|
||
(2, 1e-5, 640_000, 8)], # lr = learning rate
|
||
```
|
||
|
||
声码器-预处理数据集时:将 `synthesizer/hparams.py`中的batch_size参数调小
|
||
```
|
||
//调整前
|
||
### Data Preprocessing
|
||
max_mel_frames = 900,
|
||
rescale = True,
|
||
rescaling_max = 0.9,
|
||
synthesis_batch_size = 16, # For vocoder preprocessing and inference.
|
||
//调整后
|
||
### Data Preprocessing
|
||
max_mel_frames = 900,
|
||
rescale = True,
|
||
rescaling_max = 0.9,
|
||
synthesis_batch_size = 8, # For vocoder preprocessing and inference.
|
||
```
|
||
|
||
声码器-训练声码器时:将 `vocoder/wavernn/hparams.py`中的batch_size参数调小
|
||
```
|
||
//调整前
|
||
# Training
|
||
voc_batch_size = 100
|
||
voc_lr = 1e-4
|
||
voc_gen_at_checkpoint = 5
|
||
voc_pad = 2
|
||
|
||
//调整后
|
||
# Training
|
||
voc_batch_size = 6
|
||
voc_lr = 1e-4
|
||
voc_gen_at_checkpoint = 5
|
||
voc_pad =2
|
||
```
|
||
|
||
#### 4.碰到`RuntimeError: Error(s) in loading state_dict for Tacotron: size mismatch for encoder.embedding.weight: copying a param with shape torch.Size([70, 512]) from checkpoint, the shape in current model is torch.Size([75, 512]).`
|
||
请参照 issue [#37](https://github.com/babysor/MockingBird/issues/37)
|
||
|
||
#### 5.如何改善CPU、GPU占用率?
|
||
视情况调整batch_size参数来改善
|
||
|
||
#### 6.发生 `页面文件太小,无法完成操作`
|
||
请参考这篇[文章](https://blog.csdn.net/qq_17755303/article/details/112564030),将虚拟内存更改为100G(102400),例如:文件放置D盘就更改D盘的虚拟内存
|
||
|
||
#### 7.什么时候算训练完成?
|
||
首先一定要出现注意力模型,其次是loss足够低,取决于硬件设备和数据集。拿本人的供参考,我的注意力是在 18k 步之后出现的,并且在 50k 步之后损失变得低于 0.4
|
||

|
||
|
||

|
||
|