mirror of
https://github.com/babysor/MockingBird.git
synced 2024-03-22 13:11:31 +08:00
63 lines
3.1 KiB
Markdown
63 lines
3.1 KiB
Markdown

|
||
|
||
[](http://choosealicense.com/licenses/mit/)
|
||
> This repository is forked from [Real-Time-Voice-Cloning](https://github.com/CorentinJ/Real-Time-Voice-Cloning) which only support English.
|
||
|
||
> English | [中文](README-CN.md)
|
||
|
||
## Features
|
||
🌍 **Chinese** supported mandarin and tested with multiple datasets: aidatatang_200zh, SLR68
|
||
|
||
🤩 **PyTorch** worked for pytorch, tested in version of 1.9.0(latest in August 2021), with GPU Tesla T4 and GTX 2060
|
||
|
||
🌍 **Windows + Linux** tested in both Windows OS and linux OS after fixing nits
|
||
|
||
🤩 **Easy & Awesome** effect with only newly-trained synthesizer, by reusing the pretrained encoder/vocoder
|
||
|
||
|
||
### [DEMO VIDEO](https://www.bilibili.com/video/BV1sA411P7wM/)
|
||
|
||
## Quick Start
|
||
|
||
### 1. Install Requirements
|
||
> Follow the original repo to test if you got all environment ready.
|
||
**Python 3.7 or higher ** is needed to run the toolbox.
|
||
|
||
* Install [PyTorch](https://pytorch.org/get-started/locally/).
|
||
* Install [ffmpeg](https://ffmpeg.org/download.html#get-packages).
|
||
* Run `pip install -r requirements.txt` to install the remaining necessary packages.
|
||
|
||
### 2. Reuse the pretrained encoder/vocoder
|
||
* Download the following models and extract the encoder and vocoder models to the according directory of this project. Don't use the synthesizer
|
||
https://github.com/CorentinJ/Real-Time-Voice-Cloning/wiki/Pretrained-models
|
||
> Note that we need to specify the newly trained synthesizer model, since the original model is incompatible with the Chinese sympols. It means the demo_cli is not working at this moment.
|
||
### 3. Train synthesizer with your dataset
|
||
* Download aidatatang_200zh or SLR68 dataset and unzip: make sure you can access all .wav in *train* folder
|
||
* Preprocess with the audios and the mel spectrograms:
|
||
`python synthesizer_preprocess_audio.py <datasets_root>`
|
||
Allow parameter `--dataset {dataset}` to support adatatang_200zh, SLR68
|
||
* Preprocess the embeddings:
|
||
`python synthesizer_preprocess_embeds.py <datasets_root>/SV2TTS/synthesizer`
|
||
|
||
* Train the synthesizer:
|
||
`python synthesizer_train.py mandarin <datasets_root>/SV2TTS/synthesizer`
|
||
|
||
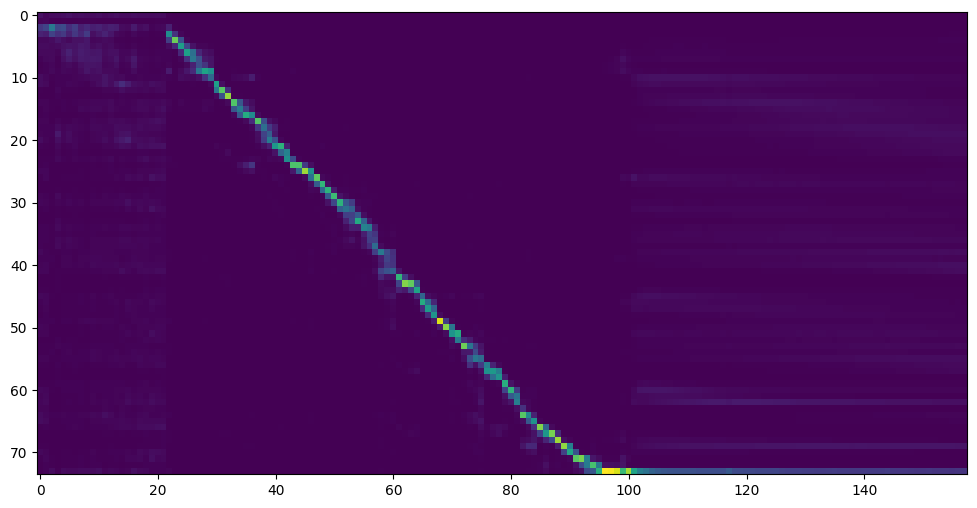
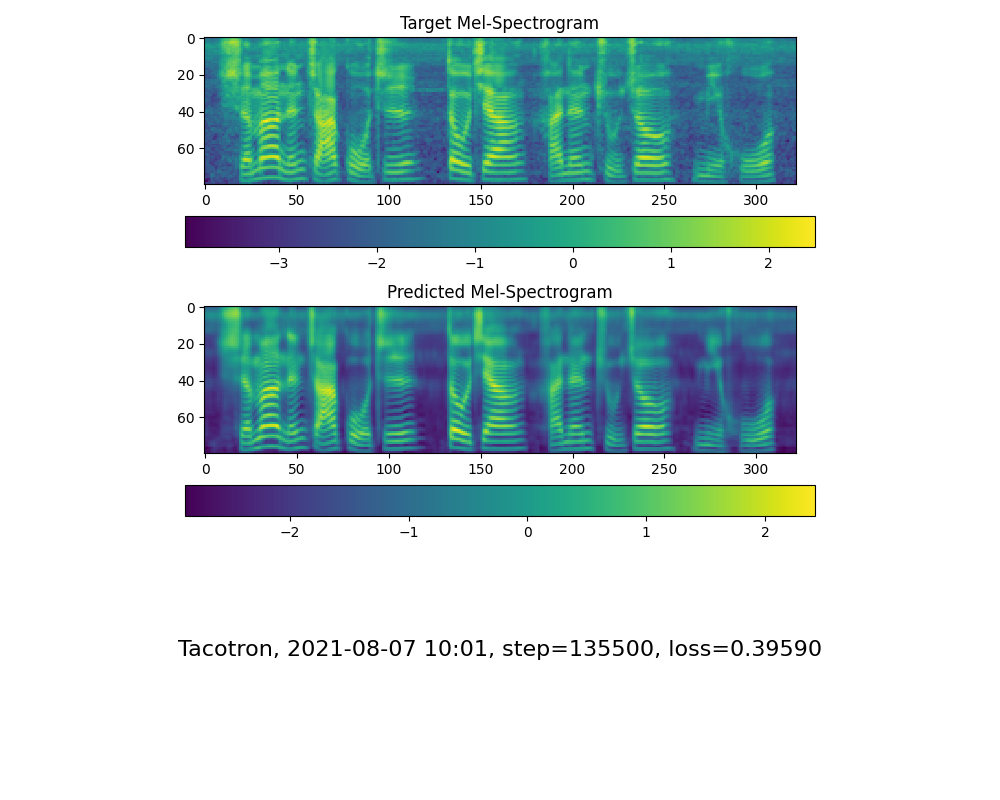
* Go to next step when you see attention line show and loss meet your need in training folder *synthesizer/saved_models/*.
|
||
> FYI, my attention came after 18k steps and loss became lower than 0.4 after 50k steps.
|
||
|
||
|
||
> A link to my early trained model: [Baidu Yun](https://pan.baidu.com/s/10t3XycWiNIg5dN5E_bMORQ)
|
||
Code:aid4
|
||
### 4. Launch the Toolbox
|
||
You can then try the toolbox:
|
||
|
||
`python demo_toolbox.py -d <datasets_root>`
|
||
or
|
||
`python demo_toolbox.py`
|
||
|
||
## TODO
|
||
- [x] Add demo video
|
||
- [X] Add support for more dataset
|
||
- [X] Upload pretrained model
|
||
- 🙏 Welcome to add more
|